| This manual is deprecated. Please visit https://groupoffice.readthedocs.io for the latest documentation. |
Difference between revisions of "Getting started"
(→Links) |
(→New menu) |
||
| (2 intermediate revisions by the same user not shown) | |||
| Line 81: | Line 81: | ||
#Users | #Users | ||
| − | To link one item to another take the following steps. Find the "Links" button for example go to Addressbook -> Contacts-> Select a contact. The information panel on the right is loaded. And the "Links" button will become active. | + | To link one item to another take the following steps. Find the "Links" button for example go to: |
| + | |||
| + | Addressbook -> Contacts-> Select a contact. | ||
| + | |||
| + | The information panel on the right is loaded. And the "Links" button will become active. Click it to browse the links. From the link browser you can click at "Link" to add a new link. A search dialog will popup that allows you to search trough all linkable items in Group-Office. View the image "Linking items" for a screenshot of this process. | ||
| + | |||
| + | ===New menu=== | ||
| + | [[Image:Newmenu.png|left|New menu]] | ||
| + | You can also create a new item from a linkable item with the "New menu". Click at "New" from the information pane to see a submenu of items that will be linked to the contact instantly when you create it from there. | ||
Latest revision as of 17:43, 21 December 2009
When you've got everything working properly a very important step needs to be taken. The setup of the Group-Office environment. This page will give you an example of what we think is the perfect Group-Office setup for companies that want to take full advantage of all Group-Office features for office use.
The administrator account
It's important that you use this account only for administrative purposes. We strongly advise you not to use this account as a regular user for safety and usability reasons. Basically use the administrator account only for:
- Adding and editing user accounts
- Adding and editing user groups
- Installing/removing modules
- Creating items that are commonly used for more users such as a global addressbook, shared calendars or a corporate HTML template for outgoing e-mail messages.
- It's very important that you do this as an administrator so you will avoid the following scenario
- User 1 creates an addressbook and projects. This user shares these items with everybody. Everybody uses those items. Now User 1 no longer works at your company. Time to remove the user account. Oops! The
- projects and his addressbook are gone too!
Create user groups
First create user groups for your company. Permissions are much easier to handle with groups then with individual users. When you grant the secretary access to all calendars as a user it will be a painful job to reset all permissions to another user when a new secretary joins the company. If you had done it with a group you could simply add the new employee to the secretary user group. So choose your groups wise with user permissions in mind. For example create:
- A secretary group called "Secretary"
- A group for the engineers called "Engineering"
A few special groups are created by default:
- Admins, users of this group will have permission to everything. Usually you don't want to add any user to this group. See above.
- Everyone, all users are in this group. Use carefully when granting permissions to this group.
- Internal, this group is created by default and new users are commonly added to this group by default. It should contain all company users and not your customers
Create users
Now that we've got the groups set up it's time to add the users. Remember that the default access permissions can be set by the system administrator in the main configuration file (config.php). Give users only "Usage" access to modules. The difference between Usage and Manage permissions on module are described in the table below:
| Module | Extra privileges with manage permissions |
|---|---|
| Addressbook | Create addressbooks, change ownership of addressbooks |
| Calendar | Create calendars, change ownership of addressbooks, edit all events |
| Filesystem | No difference |
| Summary | Manage announcements on the right side of the screen |
| Edit and add account settings | |
| Projects | Adding projects |
| Notes | No difference |
| Billing | Create books |
Make sure you setup the right regional settings for the users. The timezone is particularly important because events will shift if you change this setting later on.
Links
Group-Office has a links feature. You can link a lot of items to eachother. Most of the module have a "Links" button at the information pane or in a dialog. The following items are linkable:
- Appointments
- Tasks
- Contacts
- Companies
- Projects
- Invoices
- Notes
- Files
- Users
To link one item to another take the following steps. Find the "Links" button for example go to:
Addressbook -> Contacts-> Select a contact.
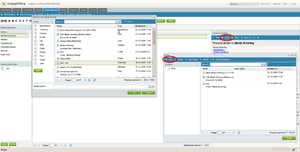
The information panel on the right is loaded. And the "Links" button will become active. Click it to browse the links. From the link browser you can click at "Link" to add a new link. A search dialog will popup that allows you to search trough all linkable items in Group-Office. View the image "Linking items" for a screenshot of this process.
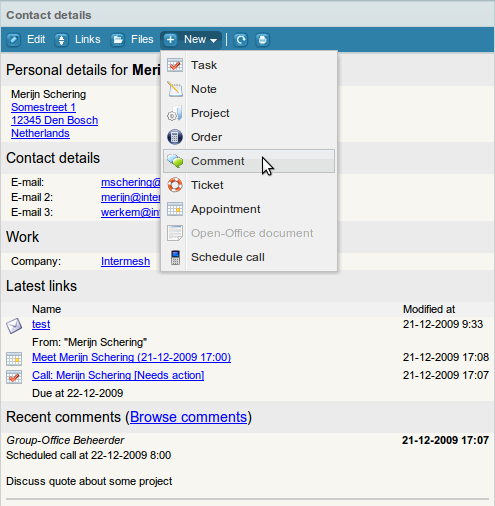
You can also create a new item from a linkable item with the "New menu". Click at "New" from the information pane to see a submenu of items that will be linked to the contact instantly when you create it from there.

