| This manual is deprecated. Please visit https://groupoffice.readthedocs.io for the latest documentation. |
Difference between revisions of "Calendar"
(→Creating resources) |
(→Resources) |
||
| Line 62: | Line 62: | ||
In the participants panel you can easily check the availability. If it's an external contact the availablity can't be checked and a question mark is shown. | In the participants panel you can easily check the availability. If it's an external contact the availablity can't be checked and a question mark is shown. | ||
| − | =Resources= | + | ==Resources== |
It's possible to create resources in Group-Office to manage meeting rooms or company cars for example. The resources are organized in groups and have can have administrators per group. Administrators must check and approve resource bookings. The resources are part of the calendar module and also work together with custom fields. | It's possible to create resources in Group-Office to manage meeting rooms or company cars for example. The resources are organized in groups and have can have administrators per group. Administrators must check and approve resource bookings. The resources are part of the calendar module and also work together with custom fields. | ||
| − | == | + | ===Resource administration=== |
| + | For resource adminstration this option you need manage permissions for the calendar module. | ||
| − | + | ====Creating resource groups==== | |
To open the resource group management go to: | To open the resource group management go to: | ||
| Line 78: | Line 79: | ||
After hitting apply the "Administrators" tab is enabled. It's required to add at least one administrator to the group. A group administrator must check and approve a booking. Administrators will automatically have write permissions for the resources in this group. | After hitting apply the "Administrators" tab is enabled. It's required to add at least one administrator to the group. A group administrator must check and approve a booking. Administrators will automatically have write permissions for the resources in this group. | ||
| − | ==Creating resources== | + | ====Creating resources==== |
After you setup a resource group you can add resources. Go to: | After you setup a resource group you can add resources. Go to: | ||
| Line 91: | Line 92: | ||
[[Image:Resource-red-status.png]] | [[Image:Resource-red-status.png]] | ||
| + | |||
| + | ===Booking a resource=== | ||
| + | When you have access to a resource you can book them from the new event dialog in the calendar. Go to: | ||
| + | |||
| + | Calendar -> Add -> Resources. | ||
| + | |||
| + | Select the resource(s) you want to use with your event (The lunch, beamer and persons input fields are custom fields in this example): | ||
| + | |||
| + | [[Image:Book-resource.png]] | ||
| + | |||
| + | When the event is saved an e-mail goes out to all administrators: | ||
| + | |||
| + | [[Image::Resource-booked-email.png]] | ||
| + | |||
| + | The administrator must approve the booking unless you are an adminstrator yourself. | ||
| + | |||
| + | ===Accepting or rejecting a resource=== | ||
| + | When you are a resource adminstrator and you get an e-mail like displayed above, you can click on the link to open the booking or you can browse to: | ||
| + | |||
| + | Calendar -> Resources -> The resource | ||
| + | |||
| + | You can change the status to "Accepted" or "Rejected" in the dialog: | ||
| + | |||
| + | [[Image:Accept-resource.png]] | ||
| + | |||
| + | A notification e-mail goes out to the user who booked it with the status: | ||
| + | |||
| + | [[Image:Resource-booked-email.png]] | ||
Revision as of 16:02, 30 December 2009
Collaborative calendering is very easy with Group-Office. You have a very intuitive web interface with different views and you can invite participants.
Contents
[hide]Configuring the calendar
The calendar should work well for most people out of the box but there are a couple of things you can configure.
General settings
At Settings -> Calendar you can setup:
- The default calendar
In case you have multiple calendars this calendar will be used to schedule events in when people use the "add appointment directly to calendars" option when inviting participants (see below). It will also open first when you launch the calendar. - Default reminder
If you set a default reminder here every event you schedule will have a reminder - Default background color
Select a different default background color for your events.
Settings per calendar
At Calendar -> Administration -> Doubleclick calendar you can setup:
- Show birthdays from the addressbook
All contacts with a birthday set in the addressbook will show up in the calendar and summary page - Show tasks from tasklists
You can select the tasklists you want to see in the calendar view too.
Sharing calendars
By default, all calendars are writable for the user group "Internal". All users are in that group by default as well. So, by default, all users can write to eachothers calendars.
If you want to edit the calendar permissions to share a calendar you must go to:
Calendar -> Settings -> Double click calendar -> Write / Read permissions
Here you can add the users and user groups you want to grant access. Read more about managing permissions here.
Views
With views you can view multiple calendars in one page. By default there is a view created that contains the first 15 calendars created in Group-Office. You can add and remove views at:
Calendar -> Settings -> Views
You can also edit them here to add and remove calendars from views.
Schedule an appointment
To schedule an appointment go to:
Start menu -> Calendar
At the left you see a list of all calendars you have access to. Select the calendar you want to schedule the appointment in. Browse to the right date and click and drag the appointment into the grid. The edit appointment dialog pops up where you can enter the details. Only the subject field is mandatory.
Inviting participants
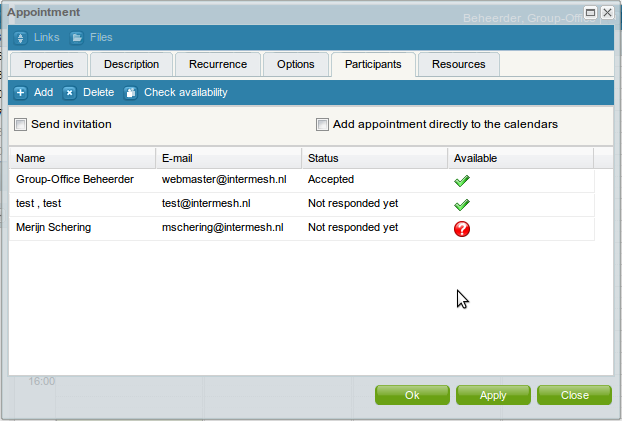
You can also invite participants to the appointment. Click at the "Participants" tab to add participants. You can add users or contacts. When you add a system user Group-Office can determine if the schedule of this user is free. You can click at the "Check availability" screen to find a free time.
There are also two tick boxes:
Send invitation
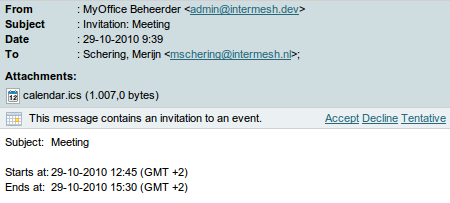
If you tick this box Group-Office will send an e-mail to all the participants like this:
When they accept it users can add the appointment to their calendar. External contacts can import the appointment using the calendar attachment.
Add appointment directly to the calendars
If you tick this box the appointment will be saved directly to the all the user calendars if you have write permission to their calendars.
In the participants panel you can easily check the availability. If it's an external contact the availablity can't be checked and a question mark is shown.
Resources
It's possible to create resources in Group-Office to manage meeting rooms or company cars for example. The resources are organized in groups and have can have administrators per group. Administrators must check and approve resource bookings. The resources are part of the calendar module and also work together with custom fields.
Resource administration
For resource adminstration this option you need manage permissions for the calendar module.
Creating resource groups
To open the resource group management go to:
Calendar -> Administration -> Resource groups -> Add
Enter a name for the group and click at “Apply”. You can also select the custom field categories you want to use with this type of resource. For meeting rooms you might want to create a category with a checkbox for lunch, a beamer or a textfield for the number of persons. Click here to read more about creating custom fields.
After hitting apply the "Administrators" tab is enabled. It's required to add at least one administrator to the group. A group administrator must check and approve a booking. Administrators will automatically have write permissions for the resources in this group.
Creating resources
After you setup a resource group you can add resources. Go to:
Calendar -> Administration -> Recources -> Add
Enter a name and click on "Apply". The permissions tab is now enabled.
Important
Give users that need to book this resource read permission. They don't need write permissions. If you give them write permissions they will be able to accept their own bookings and that's probably not wat you want.
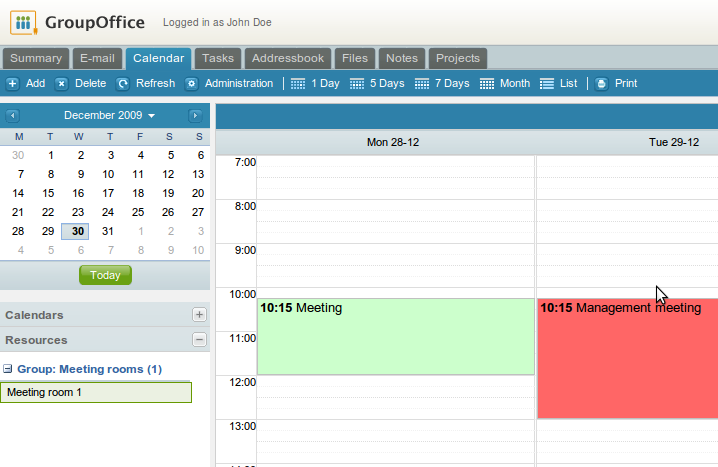
After at least one resource is created the "Resources" panel in the calendar navigation on the left is available. New bookings are shown in red, accepted bookings turn green:
Booking a resource
When you have access to a resource you can book them from the new event dialog in the calendar. Go to:
Calendar -> Add -> Resources.
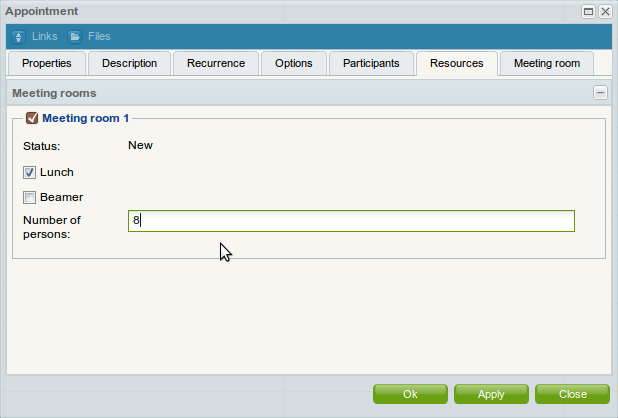
Select the resource(s) you want to use with your event (The lunch, beamer and persons input fields are custom fields in this example):
When the event is saved an e-mail goes out to all administrators:
[[Image::Resource-booked-email.png]]
The administrator must approve the booking unless you are an adminstrator yourself.
Accepting or rejecting a resource
When you are a resource adminstrator and you get an e-mail like displayed above, you can click on the link to open the booking or you can browse to:
Calendar -> Resources -> The resource
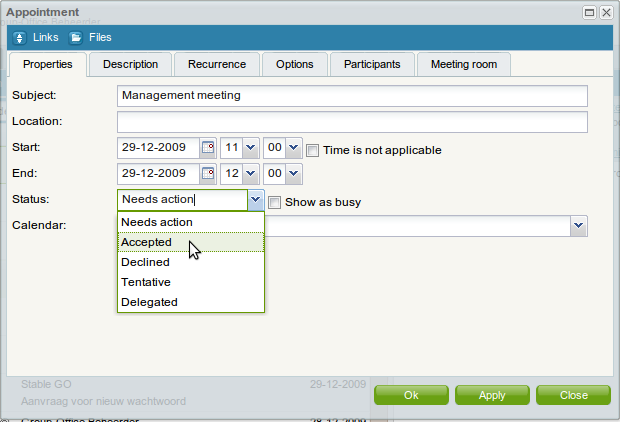
You can change the status to "Accepted" or "Rejected" in the dialog:
A notification e-mail goes out to the user who booked it with the status:
