| This manual is deprecated. Please visit https://groupoffice.readthedocs.io for the latest documentation. |
Tickets
Contents
[hide]New manual in progress
We're working on a new manual. It's not complete but it might already be useful for you:
https://www.group-office.com/docs/admin/tickets.html
With the helpdesk or tickets module you can support your customers. Delegate support calls easily and keep track of the history. Support tickets can be created by e-mail, phone or an easy web form.
Setting it up
Defining types
Ticket types categorize the tickets. For example you could define Sales, Printer problems, Server problems etc. You can define ticket types at:
Administration -> Types
Per ticket type you can enable the option to send an e-mail to the ticket agents that have access to this type when a new ticket is created by a customer.
E-mail templates
In the administration window you can set various e-mail templates that are sent to customers when they create a new ticket.
The following template variables can be used to show information about the current logged in user in the outgoing ticket email:
{user:sirmadam} Sir or Madam depending on the gender.
{user:name}
{user:first_name}
{user:middle_name}
{user:last_name}
{user:initials}
{user:title}
{user:email}
{user:home_phone}
{user:fax}
{user:cellular}
{user:address}
{user:address_no}
{user:zip}
{user:city}
{user:state}
{user:country}
{user:department}
{user:function}
{user:department}
The following template variables can be used to show information about the contact that is set in the ticket:
{contact:sirmadam} Sir or Madam depending on the gender.
{contact:salutation} The salutation
{contact:formatted_address} Get the full address formatted according to the country standards.

{contact:first_name} First name
{contact:middle_name}
{contact:last_name}
{contact:initials}
{contact:title}
{contact:email}
{contact:home_phone}
{contact:fax}
{contact:cellular}
{contact:address}
{contact:address_no}
{contact:zip}
{contact:city}
{contact:state}
{contact:country}
{contact:department}
{contact:function}
{contact:work_phone}
{contact:work_fax}
{contact:homepage}
If the contact has a company set then you can also use these variables to show the company information:
{company:formatted_address} Get the full address formatted according to the country standards.
{company:formatted_post_address} Get the full address formatted according to the country standards.

{company:mtime}
{company:ctime}
{company:crn} Company registration number
{company:iban}
{company:vat_no}
{company:bank_no}
{company:comment}
{company:homepage}
{company:email}
{company:fax}
{company:phone}
{company:post_zip}
{company:post_country}
{company:post_state}
{company:post_city}
{company:post_address_no}
{company:post_address}
{company:country}
{company:state}
{company:city}
{company:zip}
{company:address}
{company:address_no}
{company:name2}
{company:name}
{company:id}
The following template variables can be used to show information about the ticket itself:
{AGENT} The current ticket agent that corresponds with the contact.
{MESSAGE} The current message that is about to be sent.
{LINK} Hyperlink to the ticket's page.
{ticket:ticket_number}
{ticket:subject}
{ticket:company}
{ticket:first_name} Contact's first name.
{ticket:middle_name} Contact's middle name.
{ticket:last_name} Contact's last name.
{ticket:email} Contact's email address.
{ticket:phone} Contact's phone number.
Permissions
You can control who is a ticket agent per ticket type. If a user has manage permissions on a ticket type he can see all of the tickets and may also claim them and reply to them. If you give a user any lower permission level, this user may only create and view his own tickets. With read only permissions users can still reply to their existing tickets, but they can't create new tickets.
Deleting tickets
In version 4.2 and higher tickets cannot be deleted anymore by users that don't have manage permissions on the ticket module. This is done because tickets normally don't need to be deleted. (Normally the status is set to "closed"). An user with "Manage permissions" on the ticket module can delete them if necessary.
Bold tickets
Tickets show up in bold when the customer has created or replied to a ticket. It stays bold until you reply to the customer or close the ticket.
Creating a ticket
To create a ticket you don't need to be a user of Group-Office. So there are two scenario's.
- You are a Group-Office user
- You are NOT a Group-Office user
In the following sub-items these scenario's are explained.
As a Group-Office user with access to the tickets module
If you are a Group-Office user but don't have access to the ticket module then you must read the "As guest without access to Group-Office" section.
If you are a user of Group-Office and have access to the ticket module then you can create tickets in Group-Office itself.
You don't need to use the external webpage.
After you have created a ticket, an email will be send to the users' e-mail address with a link inside to the created ticket.
If you click on that link then the browser will open a new window (or tab) and you'll need to log in to Group-Office to view the ticket.
As guest without access to Group-Office
Make sure the external page and anonymous access is enabled at Tickets -> Administration -> External page.
Then visit:
http://yourdomain.com/groupoffice/modules/site/index.php?r=tickets/externalpage/newTicket
Ticket groups
With ticket groups you can share tickets between users. If users belong to the same ticket group they can see each others tickets. This can be useful if you have users that work at the same company. It's also possible to devide companies into multiple groups with a superuser who can view all tickets.
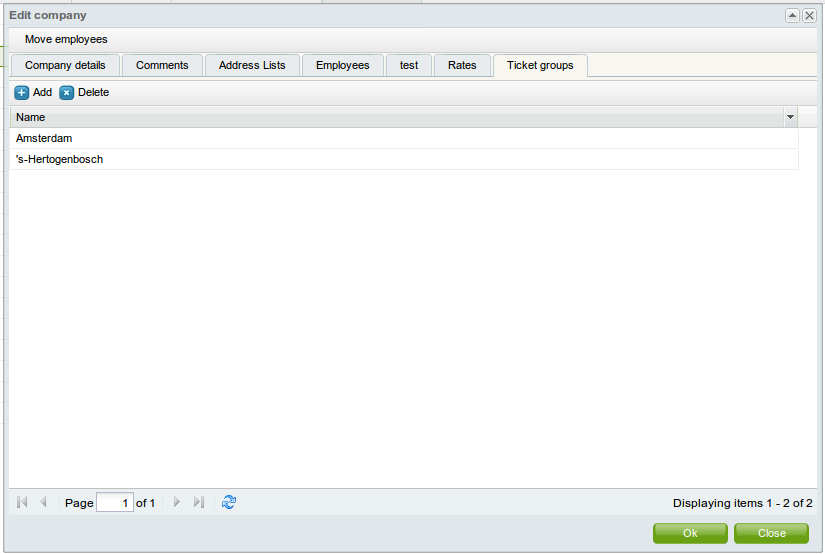
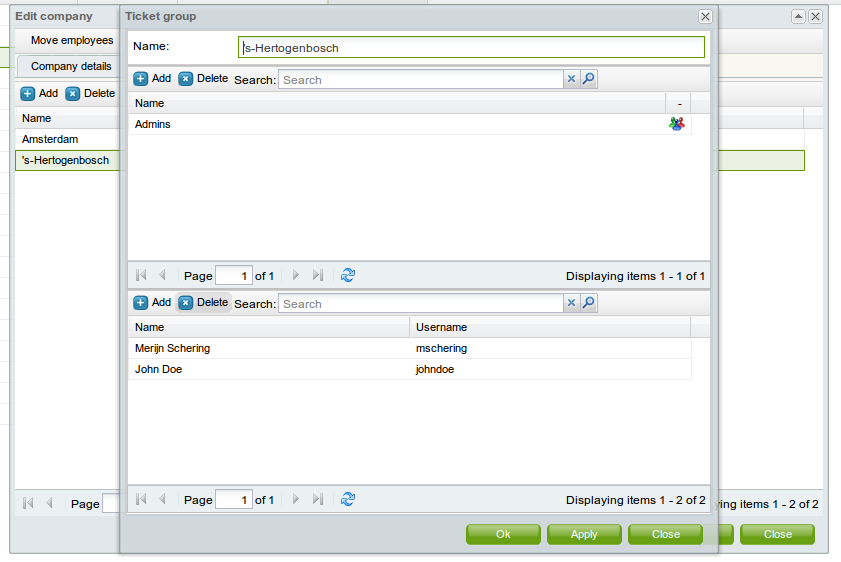
You can add ticket groups in the addressbook at the company profile. See the screenshot. Here we added group "Amsterdam" and "'s-Hertogenbosch" to the company Intermesh. We've also made Merijn Schering and John doe members of these group "Amsterdam". The result will be that all tickets created for Amsterdam will be visible to both Merijn and John.
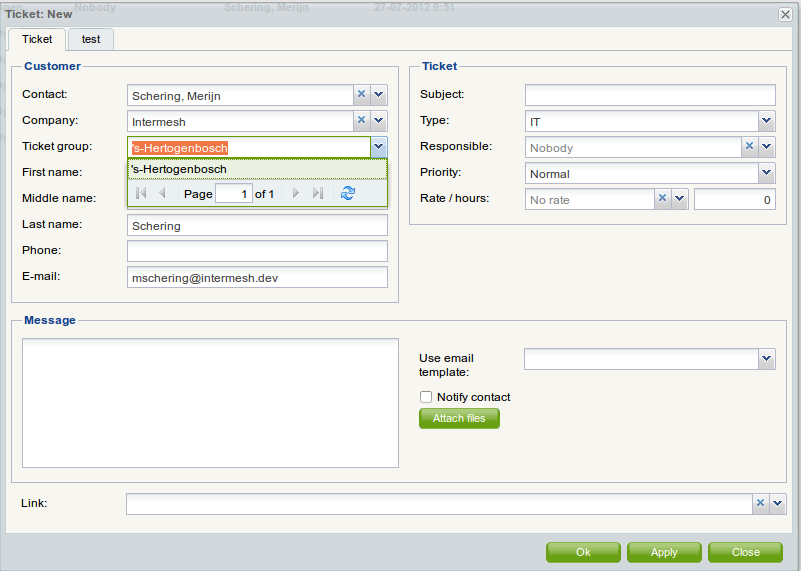
Now when we create ticket for Merijn Schering it will automatically show the ticket group selection (See screenshot).
E-mail to tickets
You can set up at least one e-mail address for the ticket system. Group-Office will periodically poll an IMAP account and convert the e-mails into tickets.
First you need to setup an e-mail account.
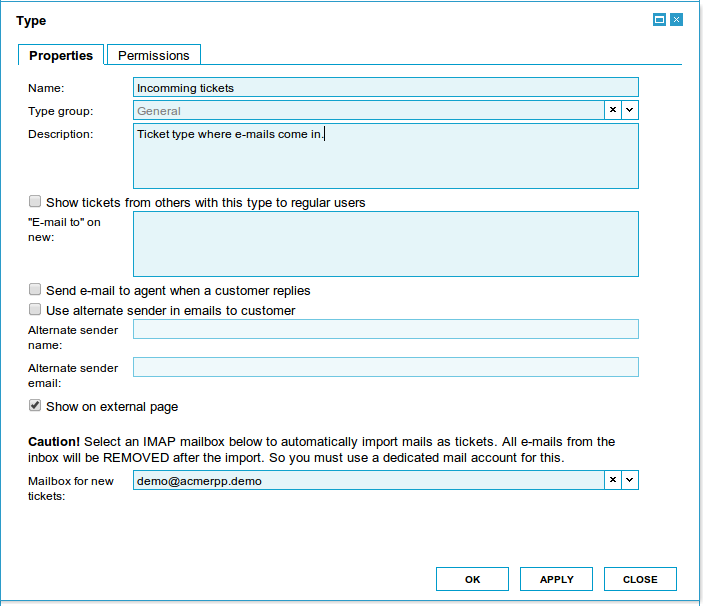
After that has been done you can go to Tickets -> Administration -> Types -> Double click the type. In this screen you can select the IMAP account to import from. Note that mails will be deleted from the INBOX after conversion so be careful! You can set up an account for each ticket type if you like.
By default Group-Office installs a system task that imports it every 5 minutes. You can adjust this in the "Manage system tasks" module (if import does not work, check, if this module is installed).


